Frequently Asked Questions

The answers given below relate to the journal management system currently in operation at PsychOpen GOLD (OJS 3.1.2). If you have a question to which you cannot find an answer below, please contact our technical support team at .

Authors

Information for authors about the publication process.

The copyediting and proofreading stages are crucial for finalizing your article. Here’s what you need to know for each phase:

Copyediting Phase

  • Use the track changes feature of your Word Processor when editing. This ensures copyeditors can see your revisions.
  • This is your final opportunity to make essential changes, such as correcting serious content errors or adding important information (e.g., a missing contributor name).
  • Extensive rewriting, reformulating large portions, or numerous minor stylistic changes are not possible at this stage.
  • The manuscript formatting (e.g., tables, reference list) is not final at this point.
  • Contact the editorial team immediately if you can’t meet their deadlines.

Proofreading Phase

  • Include your comments directly in the PDF or in the discussion thread in the journal management system. If using the discussion, be as specific as possible (i.e., include page, line, and context).
  • Carefully check for errors in spelling, grammar, and formatting.
  • Be aware that changes have been made to conform to the journal’s in-house style and current APA guidelines.

Supplementary materials should provide additional, non-redundant information, essential for fully understanding the main paper (e.g., additional analyses, exact stimuli used). Supplementary materials will be published as received without conversion, testing, or reformatting. Authors are responsible for the content and functionality of these materials.

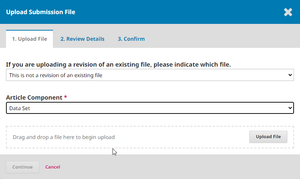
To ensure anonymous review, please remove all personal information from the files, including file properties. Supplementary materials undergo the same peer-review process as the main article. During step 2 of the online submission process (1), upload each supplementary file separately (2). Make sure to select the relevant component for the supplementary file. Each file may not exceed a maximum file size of 8MB.

1. Upload submission
2. Upload supplementary material

The final version of supplementary materials will be published in the PsychArchives repository. The journal can submit these files to PsychArchives for you. Prepare the final version according to the guidelines provided on the journal website.

The appropriate contact person varies depending on the stage of the publication process.

  • Before the review process begins contact the Editor-in-Chief for questions about the journal’s scope etc.
  • After the review process has started contact the Associate Editor.
  • After copyediting has begun contact the production editor. They will reach out to you with information about the next steps, after your article is accepted. Note, production editors are identifiable through their account name “PsychOpen (ZPID) Copyediting Team” in the journal management system.
  • For technical support contact our technical support team at any stage.

Alternatively to directly emailing the above, you can use the Add Discussion feature on the submission page at each stage of the submission in the journal management system. Try to use the most appropriate channel of communication for each stage to ensure your queries are addressed efficiently. If you’re unsure about whom to contact, you can always reach out to the Editors-in-Chief or the technical support team.

To indicate shared first authorship in your manuscript, please follow these steps:

  • On the title page add a paragraph symbol (§) after the names of all authors who share first authorship.
  • Add a corresponding note below the affiliations explaining the shared first authorship. The exact wording of the note is not crucial - a standard text will be automatically generated during the production process. The note should clearly indicate that shared first authorship is intended. The key is to make it clear to the editorial team that shared first authorship is intended.
  • Last authorship and other special authorship status, can be indicated in the same way.

If you have any questions about how to format this in your specific manuscript, please don’t hesitate to contact the journal’s editorial office for guidance.

The review and publication process can vary, but generally:

  • The review process typically takes up to 3 months. It can vary, depending on the journal and the nature of the submission.
  • The publication timeline depends on factors, such as the complexity of the review process, and any necessary revisions.
  • There are no fees for submission or publication in any of our journals. The entire process is free for authors, editors, and societies (Diamond Open Access).
  • Indexing in various databases occurs automatically after publication. There are no additional fees or processes required for indexing.

We recommend checking the specific journal’s website for more details about their particular timelines and policies.

Journals send out notifications about various events both through the journal management system (OJS) and by email. Additionally, a journal may have its own separate mailing list (e.g., for sending out newsletters).

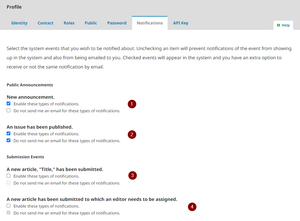
If you wish no longer wish to receive certain (or all) notifications, you can control this via your profile. Login to the journal’s management system and click on your username on the top right-hand corner. Click on View Profile and from there choose the tab Notifications (see screenshot). Uncheck each notification that you no longer wish to receive. If only the top tick box is checked (1) you will receive notifications in the system and by email. If both tick boxes are checked (2), you will only receive notifications in the system but not by email. If both tick boxed are unchecked (3), or the “Do not send me …” option has a greyed out tick (4), you will not receive any notifications at all.

1. Notification settings

If you have signed up to the journal’s external mailing list, you may have to option to unsubscribe via the email you received. Should this not be the case, please contact the journal’s Editor-in-Chief. If you have never registered with the journal yourself and receive unwanted emails, please contact our technical support team.

No, author information cannot be updated after publication. The author information, including affiliations, should reflect the status at the time of publication. Subsequent changes in an author’s career or institutional affiliation are not reflected in published articles. Once an article is published, the author information becomes a permanent part of the publication record and cannot be altered to reflect future changes.

Please ensure all author information is current and accurate during the final stages of the publication process.

If you’ve published an article in one of our journals, you generally don’t need to request additional permission to use figures from that article. Here’s what you need to know:

  • Our journals publish articles under a Creative Commons Attribution (CC-BY 4.0) license. This license allows you to freely reuse, adapt, and share the content (including figures and images, unless otherwise noted), as long as you adhere to the license terms.
  • You don’t need to request separate permission from the journal to use these figures in your work.
  • When using the figures/images, make sure to properly cite the original publication attribution.
  • If you’re using content from other sources, always check their specific copyright and permission requirements.

If you have any doubts or need further clarification about using specific content, don’t hesitate to contact our technical support team for confirmation.

Editors

Guidance and support specifically for Editors-in-Chief and Handling Editors.

If you’re unable to access the Editorial History of a submission, please consider the following:

  • The most common cause of this issue is an active ad blocker. Ad blocking software can sometimes interfere with certain features of the journal management system. To troubleshooting this temporarily disable your ad blocker for the journal website and try to access the Editorial History again. If disabling the ad blocker doesn’t work, try using a different web browser.
  • Sometimes, clearing your browser’s cache and cookies can resolve access issues.

If you continue to experience problems after trying these steps, please contact our technical support team for further assistance. They may be able to provide more specific guidance based on your particular situation.

In your role as editor, you should reject a submission in the journal management system if the author has requested this. You can state the author’s withdrawal request as the reason for the rejection. Click the Decline Submission button to initiate this. If the review process has already begun, make sure to inform the assigned reviewers about the withdrawal.

Changing a user’s email address or other information in the journal system is a straightforward process. There is no need to create a new user account if the email address is incorrect or outdated. Please note:

  • Users can change their own email address and other personal information by logging in and clicking on their username in the top right-hand corner of the journal website and then choosing View Profile.
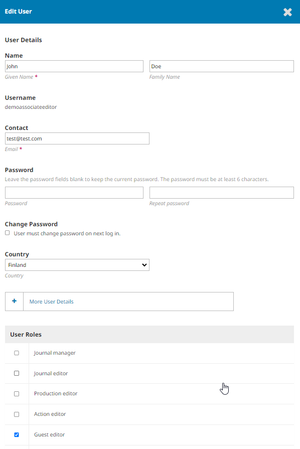
  • Editors-in-Chief can modify information for Users and Editors by selecting Users & Roles from the main menu, then Users, searching for the specific user, clicking on the arrow below the user’s name, and then selecting Edit User (1).
1. Edit User
1. Edit User

If you need to update the information for a particular user but get a message that you have no permission to do so, please contact our technical support team.

The best approach is to reassign the submission to the co-author. You can do this as follows:

  1. Select the submission in question and find the Participants block on the right-hand side of the submission page.
  2. Click Assign and select the “Author” role under Locate a User.
  3. Add the author who is now responsible for the submission. If they do not have an account, please ask them to register first.

If you run into any problems or don’t have the necessary permissions, contact the technical support team with the specific details and author names. Remember to ensure all authors, including those who have left academia, are properly credited for their contributions in the final manuscript.

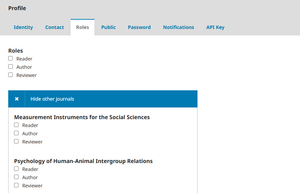
This situation can occur when a user is registered in the system but doesn’t have a role assigned for your specific journal. To resolve this, the user needs to be assigned the Reviewer role for your journal. This task can only be performed by the Editors-in-Chief or the technical support team. If you are an Associate Editor and encounter this issue, please contact the Editors-in-Chief or our technical support team for assistance.

In your role as Editor-in-Chief, search for the user in OJS by selecting Users & Roles in the main menu. Then select Users in the submenu. On this page (1) enter the user’s name in the search field, making sure that you have selected the ticked the option include users with no roles in this journal. Once you have located the user, click on the arrow in front of their name and then select Edit User. This will open a new window with the users details. Scroll to the bottom, and select the Reviewer role (2). Make sure that to click OK to save the changes.

1. User & Roles Search Page
2. Edit user and assign reviewer role

PsychOpen GOLD accepts applications for new journals or transfers of existing journals periodically. These opportunities are announced through official “Calls for Proposals”. Calls are not issued on a regular schedule and are only published when we have the capacity to take on new journals or transfers. When a new call is issued, you will find detailed information on our website.

If you’re interested in proposing a journal, we recommend to regularly check the PsychOpen GOLD website for announcements, or look for updates on our social media channels.

When an editor submits a paper to their own journal, it is important to maintain ethical standards and transparency. Please follow the process below:

  1. Submit the paper yourself, using your Editor-in-Chief account. During the initial submission process, choose the “Author” role, not the “Journal Editor” role. This will restrict your access to the submission process (e.g., you will not be able to see any reviewer information).
  2. When submitting as an author, you cannot assign a handling editor yourself. Please, inform the technical support team after submission, and they will assign an appropriate Associate Editor to handle your paper.

A disclosure statement will be added to the paper’s Competing Interest Statement, such as: “[Editor’s name] is an Editor-in-Chief of [Journal name] but was not involved in the editorial process for this paper.

You must first assign a Handling Editor (this may or may not be yourself) before you can access the option to desk reject a submission. This ensures proper documentation of the decision-making process in the system.

To desk reject a submission, follow these steps:

  1. Assign a Handling Editor
    Only the Journal Manager (Editor-in-Chief) can assign a Handling Editor to a new submission. In your role as Journal Manager, click on the submission that should be rejected. In the Participants block on the right-hand side, click Assign. Select yourself or a Handling Editor whom you would like to delegate the task to from the list of editors.
  2. Choose a predefined message to inform the Handling Editor (optional)
    At this point you can also set a predefined message (if available) to inform the handling editor of the decision to reject the submission. This message will be send as soon as you click on the OK button at the bottom.
  3. Reject the submission
    After assignment, you will be returned to the main submission page. Look for a new Decline Submission button on the right-hand side. Click to continue with the desk-rejection process.
  4. Send the decline letter
    Clicking the button will open a window. Here, you can compose and send a rejection email to the author. If you have already sent a rejection email (manually, outside of the journal management system), you can of course choose not to send another email. In this case, choose the “Do not send an email notification” from the Send Email options. Finally, click Record Editorial Decision to finalize the process.

You can remove announcements directly through the journal management system. Tip: Before removal, it’s a good idea to copy the announcement text to an external document for future reference.

  • To do so, choose Settings and then Website from the main menu.
  • On the Website Settings page choose the Announcements tab.
  • In the Announcements section, click on the arrow next to the announcement you wish to remove. You can now Edit or Remove the announcement.

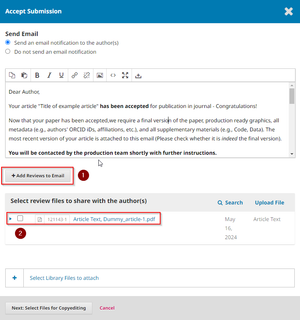
When preparing a decision letter, e.g. for “revisions needed,” the review content is not automatically attached. However, you can easily include the reviews by following these steps:

  • Review text
    Use the “Add reviews to email” (1) option to include the content of the reviewer forms as plain text in your email. This ensures that all textual feedback from reviewers is incorporated into your decision letter.

  • Reviewer files
    If reviewers have uploaded separate files (which is optional), you can attach these to your email. Look for the option “Select review files to share with the author(s)” (2) below the email text area. Select the files you wish to attach to your decision letter.

1. Attach review files

You can now proceed with the acceptance or decline process. Please ensure that all relevant feedback is shared with the authors to guide their revisions effectively.

The list of current team members for your journal is recorded in a Google Sheet to which you have been given access. If you do not know the URL of the Google Sheet please contact our technical support team. Do not share the link to this Google Sheet, as anyone with the link can make changes.

It is important to always keep the list of editors and board members up-to-date, as it provides accurate information for readers and authors, it maintains the journal’s professional image and credibility, and it ensures proper recognition of current team members. It is also be important for the production and indexing process. Keeping this information up-to-date is a collaborative effort between the Editors-in-Chief and the support team.

Adding a new team member

  • Ask the new member to register with the journal using their preferred email address. Here it does not matter which role they choose during the registration process, it will have to be changed at a later stage.
  • Add the user to the journal’s Google Sheet and assign them their respective role. These roles are pre-defined in the Google Sheet. Make sure to also enter their ORCID ID, their affiliation, city and country etc. Please leave the Photo URL field empty. Also, there is no need to order the list by role or name.
  • If the new team member is an Associate Editor, please ask them to supply a suitable photo (preferably > 920px in width or height) to display on the journal’s team page. Please send this photo to the technical support team. They will process the photo, update the Google Sheet, and add them to the journal’s team page accordingly.

Removing a team member

  • Firstly, remove the user from the Google Sheet (you can safely just delete the row).
  • Now remove the user’s role (e.g., Associate Editor) in the journal management system. Select Users & Roles and then Users from the main Menu. On the User & Roles Page click on Search and find the user. Once found click on the arrow in front of their name and choose Edit User. In the new window you can remove their privileged role. Should you get a message that you do not have permission to edit the user, please contact our technical support team, who will the remove the user’s role for you. This can happen when a user has an additional account in a different journal hosted on your system.
  • Finally, please inform the technical support team about the deletion. They will remove the user from the journal’s team page and any other relevant areas.

Reviewers

Resources and information for journal reviewers.

Sometimes certain special characters - especially emojis copied from Office documents - can cause subsequent text not to be saved in the system. To resolve this issue, avoid using emojis in your review. If you need to express emotion, stick to emoticons made with standard characters, like ;-).

If the problem persists (or you didn’t use emoticons in the first place), try breaking your review into smaller sections and saving each part separately. If you continue to experience issues, please contact our technical support team for assistance.